Dryer Venting (from a Home Inspector’s POV)
By Thomas Schlotter – Allied Home Inspections LLC
Connecticut Home Inspector HOI 445
Clothes dryers remove moisture from wet clothing by blowing hot air over them while they tumble in a spinning drum. This heat comes from either an electric heating element or a gas burner. Heavy loads of laundry can contain over a gallon of water, which turns into water vapor during drying. This vapor is expelled through an exhaust duct, commonly known as a dryer vent.
Proper installation and maintenance (cleaning) of a dryer vent are crucial:
- Connection: Ensure the vent is properly connected. This connection is usually found behind or beneath the dryer. Verify that it is securely attached.
- Restrictions: Dryer vents, typically made from flexible plastic or metal ducting, can easily kink or become crushed where they exit the dryer and enter the wall or floor. This can be problematic in tight spaces where dryers are often placed. Use vent elbows designed to make 90-degree turns without obstructing airflow. Restrictions can pose a fire hazard and should be noted in the inspector’s report.
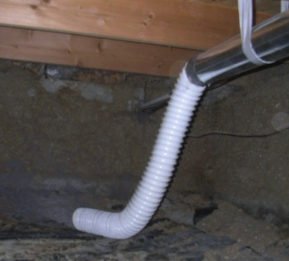
Plastic Dryer Ducting Fallen and Blowing into Crawlspace
- International Residential Code (IRC) Guidelines:
Duct Construction (M1502.5): Use rigid metal ducts with smooth interiors, at least 0.016 inches thick. Joints should run in the direction of airflow and not be fastened with sheet-metal screws or other means that extend into the duct.
Duct Length (M1502.6): The maximum length for a dryer vent should not exceed 35 feet from the dryer to the wall or roof termination. Each 45-degree bend reduces this length by 2.5 feet, and each 90-degree bend by 5 feet. Vents should be as straight as possible.
Exceptions include manufacturer instructions allowing longer vents and the use of large radius bends, which require engineering calculations beyond a general home inspection.
Duct Termination (M1502.2): Exhaust ducts should end outside the building, at least 3 feet from any openings. They must have a backdraft damper and should not have screens, which can trap lint. Many vents incorrectly terminate in crawlspaces or attics, leading to moisture problems and potential mold growth.
Duct Size (M1502.3): The duct diameter should match the dryer’s specifications as indicated on its data plate.
Transition Ducts (M1502.4): Flexible transition ducts should be no longer than 8 feet and must be labeled according to UL 2158A standards. They should not be hidden within construction.
- Duct Support (M1502.4.2): Exhaust ducts must be supported every 12 feet and secured in place. Joints should be sealed and mechanically fastened without protruding into the duct.
- Makeup Air: Ensure the laundry room has adequate makeup air to match the combined CFM of the dryer vent fan and any other fans in the room. This is critical to avoid extended drying times and reduced airflow, which can lead to lint buildup and fire hazards. If the room is sealed with no windows or door openings, this could be an issue.
- Cleaning: Make sure you have your dryer ductwork AND dryer interior cleaned on at least a yearly basis for safety.
Inspectors typically identify potential issues but may not confirm compliance with specific manufacturer recommendations or local codes. Their role is to highlight concerns that need addressing.
